Wednesday, March 5, 2014

Birthday Behavior

Well...another birthday in the books! Blessed to be healthy, have my family and they are healthy, awesome friends that are healthy too. I'm grateful for everything that I have...and can't wait to see what another year of being 30 brings. That's right...I'm 30 again and will continue to be 30 until I don't look 30 anymore lol. Just a few collages from the month and how I celebrated my birthday. 


Wednesday, January 22, 2014

Vanity

The hubby and I took a quick road trip to Atlantic City this past weekend for a friends birthday party/masquerade ball at the Revel.  I had a little bit of a tough time finding a dress that I was comfortable with wearing as I have gained a little bit of weight lately.  But I found this super cute black lace and cream dress in the juniors section in Macys.  I was a little self conscious as the dress was a body con dress...but I put on my spanks and paired it with some plain mary jane type patent leather pumps and thought I looked pretty hot for my date night!  


Because we checked into the hotel a little early and had some time to relax I was able to take a little more time with my makeup.  I went back and forth in my mind as to what look I wanted...black smoky eye...or a nice neutral eye.  So I mixed the two and I love how this neutral yet smoky look turned out.  I used my Wet N' Wild vanity palette for this look and paired it with a nude lip.  I was kind of feeling myself a bit this night lol.  Below is a list of everything I used.  


On the eyes:
NYX brow pencil in dark brown
Kevyn Aucoin sensual skin enhancer to clean up brow area and to conceal under eyes
Wet n' Wild Vanity 6 shadow eyeshadow palette
ELF 6 pan palette (the black in the smoky palette to deepen the outer-v)
Wet n' Wild gel liner in black
Rimmel London day to night mascara
Red Cherry Lashes #43

On the face:
MAC studio fix powder foundation NC43
Ruby Kisses mineral powder in Cognac to contour
Milani blush in Mai-Tai
ELF Healthy glow bronzing powder in Warm Tan

On the lips:
Wet n' Wild lipstick in Bare it All (#902C)
NYX Lipliner in Natural
NK Lipshine gloss in Taupe

Wednesday, January 15, 2014

Petal Pusher

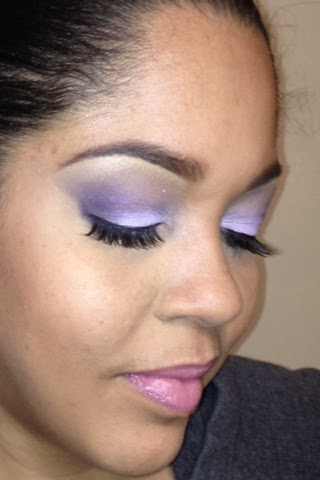
I've been challenged to make use of some of the palettes in my stash that rarely get used.  So, today I decided to break out my Wet N' Wild Petal Pusher 8 pan palette.  I will do one more look this week using this same palette.  Probably a nice purple smoky eye...ya'll know I love a good smoky eye :) Below is a list of all the products I used to achieve this look.  Do you have any palettes in your stash that hardly get used?  If so, then join me in this challenge.  Dust them off and create some looks.  


On the eyes:
NYX brow pencil in dark brown
Kevyn Aucoin sensual skin enhancer to clean up brow area and to conceal under eyes
Wet n' Wild Petal Pusher 8 pan eyeshadow palette
Wet n' Wild gel liner in black
Rimmel London day to night mascara
Red Cherry Lashes #415

On the face:
MAC studio fix powder foundation NC43
Ruby Kisses mineral powder in Cognac to contour
Milani blush in Mai-Tai

On the lips:
Wet n' Wild lipstick in Just Peachy (#903C)
ELF lip liner in Bitter
Wet n' Wild clear gloss

Thursday, January 2, 2014

Happy New Year!


Happy New Year everyone! I hope you are ready for what's in store this year! I'm claiming 2014 to be a great year with endless possibilities. So I'm going to strap up my boots and get ready for the journey! What do you have planned for this year? Any goals you hope to have accomplished by the years end? I wish all of you much success and blessings! 


Friday, August 23, 2013

INDULGE: LIP & NAIL

With the change of seasons quickly approaching, it's no surprise that MAC Cosmetics has two new fall collections to INDULGE in.  This post is all about the INDULGE: Lip & Nail collection...and this is how MAC describes it:


"Revel in a magnificent banquet of colour for lips and nails.  Lipstick in deep plum, frosted beige and sheer, golden sparkle get layered with Lipglass, ranging from blackened berry to shimmering taupe.  Lacquered nails for that opulent touch, rich in jewel tones and molten metallics."

Take a look at the items in this collection:

5 Lipsticks ($15 each)
Smash Hit
By Design
Feed the Senses
Just a Bite
Sweet Succulence

5 Tinted Lipglasses ($15 each)
Ultimate Dish
Fashion Punch
Liqueur
Lust for Life
Utterly Tart


6 Nail Lacquers ($16 each)
Sinfully Sweet
Magnificent Feast
Discotheque
Impassioned
Screening Room
Rebel

INDULGE: EYE & CHEEK

With the change of seasons quickly approaching, it's no surprise that MAC Cosmetics has two new fall collections to INDULGE in.  This post is all about the INDULGE: Eye & Cheek collection...and this is how MAC describes it:

Fall Colour is a surreal feast for the senses, where no taste is too extravagant and no behaviour beyond limits. On the menu: Cremeblend Blush flushes skin with buildable glow as Eye Shadow defines eyes for the ultimate in temptation, intensified by Fluidline. Haute & Naughty Too Black Lash darkens and lengthens lashes. 

Here's a look at the items in this collection:


8 highly-pigmented shadows ($15 each)


Guilty Morsel

Sex & The Oyster

Three Ring Yellow

Divine Decadence

Beluga

Eat...Love

Deep Cravings

Palace Pedigreed

3 ultra smooth fluidline liners:
Guilt Gourmet

Deliciously Rich

Blacktrack

Haute & Naughty Too Black Lash Mascara ($21).  A two-in-one mascara which allows you to customize your style...naturally defined or powerfully dramatic.

2 cremeblend blushes ($21 each)
Tease Your Tastes

Glamour Feast

2 Makeup Brushes
266 Small Angle Brush $20   
213 Fluff Brush $24

Monday, August 5, 2013

All About Eyes Makeup Class

If you missed part 1 of this amazing class, About Faces...shame on you! Lol...but you can read all about it in my previous blog post About Faces Makeup Class

This past Sunday I had the pleasure of taking yet another class taught by the extremely talented Brittany Rogers. I really enjoy her classes because she is very personable and makes learning fun in an informal setting.  And she always gives us little goodie boxes which is super sweet. This class was sponsored by Shades by Shay and we got two really pretty shadows that I can't wait to play in. So let's jump right into what we learned.

The first thing we went over was brow shaping.  How to clean them up....meaning where the brow should begin...arch...then end, filling them in (using pencil and powder products), and then highlighting the brow-bone area.  One awesome tip that she let us in on was using Ben Nye's banana powder after using concealer under the brows.  This not only acts as a very nice and natural highlight but will keep your eyebrows...well the products...from running down your face on those hot summer days.  (I'll be trying this out for sure.)  She told us some of her favorite brow products and brushes to experiment with and find out what works best for us.

We then talked about eye shadow application brushes.  Now, you use what works for you...but these are just the basics.  You've got your regular eye shadow brush.  They come in a variety of sizes for whatever amount of area you intend to cover.  Usually the denser brushes pick up the most product to achieve a more vibrant color payoff.  You then have your blending brushes or fluffy dome brush.  These are intended to blend out the harsh lines after packing on your color with the eye shadow brush.  Then there's the crease brush.  This brush allows you to define your crease and/or concentrate the color in one specific area.

Now...let's talk about what I consider my everyday/wear to work eye and how to achieve it.  I know it's easier to explain via video but as most of you know I am still on a YouTube hiatus (we will talk about that in a separate blog post) so you will have to use your imagination...or simply how you would apply eye shadow lol.
1. Prime eyes -  this can be done with an eye shadow primer or whatever concealer or foundation you use.  It's just something to help keep your shadow from creasing.  My current favorite is the ELF Eye Lid Primer.
2. Base eyes - this is a product that is used to help make your shadows stick to your lids.  Your choice of color depends on the color shadow you are using.  My current favorite is the NYX Jumbo Eye Pencil.
3. Pack on the shadow - pick up some shadow from the pan using your eye shadow brush and tap off the excess to prevent fall-out.  Put the shadow all over your lid but try not to put this shadow above your crease.
4. Blend! - the edges of the lid color need to look like it's fading into your skin.  Here you can use a transition color that is similar to your skin tone to blend out your lid color.
5. Define your crease - here is where you want to use your crease brush to make your eyes stand out.  On the outer portion of your eye, use a darker shadow to deepen where your eye meets your brow-bone.
6. Line your eyes - with a liquid, gel, or pencil...line your top lash line and lower water line.  For some added sultry-ness, smudge the liner on the lower lash line just a bit.
7. Mascara and/or lashes - no explanation needed lol

Smoky eyes anyone?  This is one of my favorite looks.  You don't have to just do a black smoky eye...smoke out a color for fun.  Here's how Brittany taught us to do it.  Follow steps 1-4 above.  For step 4 if you're doing say a black smoky eye...use a mid-tone brown to blend out the edges of the black.  Again, line your eyes...especially the bottom and here you definitely want to smudge shadow or liner on the lower lash line.  Add your mascara and lashes and your red carpet ready! lol.

I'll keep all of you posted on the next class that Brittany has...you surely won't want to miss it!  I hope you enjoyed my recap and now I'm off to try a colorful smoky eye...wish me luck!!!